|
I have been asked a number of times how I can tell for sure that
one die doesn't match up exactly with another. They sure look similar,
but how can a person tell for sure? Well, with modern technology
there's a rather simple method to tell for absolute certain whether
two die varieties (or anything for that matter) are exactly alike.
I
will go through this process using two photographs I took of what
some believe are two different dies and others believe are the same
die. We will see who is right. I am using Adobe Photoshop 5.0 in
this exercise, and will be showing screen shots of what I see as
I go along. Be patient as this page loads, there are a lot of graphics
on it.
Step
one:
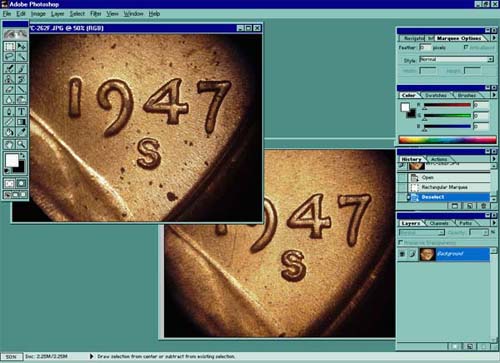
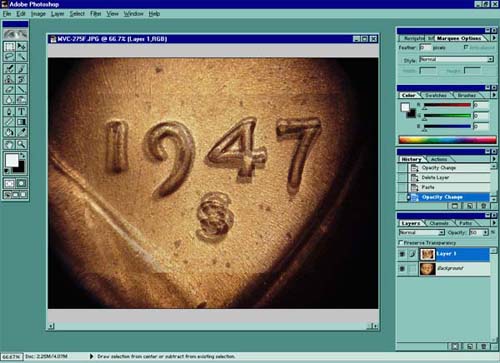
For the first step we must first start Photoshop and open the two
picture files. remember that having similar magnification, lighting,
and angle will help greatly in matching the two images for size.
The following image shows my two photographs opened together in
Photoshop.
Step
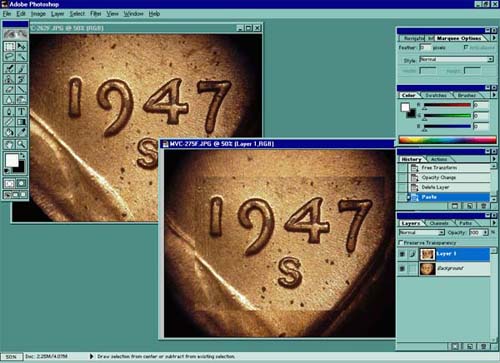
two: Now that we have the two images loaded,
select one of them (either one will do) and draw a box using the
"box" tool (top left button in your toolbox) around the
area you want to compare with the other photo. Make sure you leave
enough "static" information in the box you will overlay
to be able to align them properly. "Static" information
is something that should be in the exact same position on any coin,
such as the date or another hubbed device.
When
you have the box you want to copy to your other photo for the overlay,
copy what you've drawn (Ctrl + C) and paste it (Ctrl + V) onto your
other photo:
 Step
three: What you have now is a "layered"
image. The part of your copied photo that you pasted into the other
photo has become an independent layer "on top" of the
original image. This layer can be manipulated in any manner without
affecting the original image below it. Step
three: What you have now is a "layered"
image. The part of your copied photo that you pasted into the other
photo has become an independent layer "on top" of the
original image. This layer can be manipulated in any manner without
affecting the original image below it.
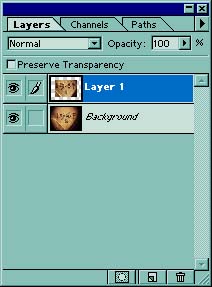
The
box shown to the right (located in the bottom right portion of Photoshop)
shows the "layers" tab. This section of your screen is
where you navigate through the layers, turn on their visibility,
link them together, and many other nifty tricks. For now, all we
will concern ourselves with is the layer's opacity (ability to "see
through" it). You can control this by clicking on the drop
down arrow and changing it with the slide bar that appears or you
can simply highlight the "100" by dragging over it, then
type in the opacity you want.
With
the top layer selected, change its opacity to 50% and press "enter".
What
you should see is this:
Notice
that you can now see both images together (but out of alignment
with one another, naturally - it's never THAT easy..). In the next
step we will align them for exact comparison.
Step
four: A little review of what we've done now...we
opened Photoshop and our two images. We have copied one of them
and pasted it on top of the other as a new layer. We have turned
the opacity of the new layer down to 50% so we can see through it.
Now we need to align the two layers with one another, exactly.
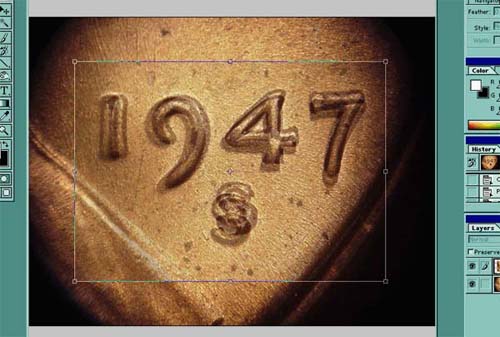
The
simple way to do this isn't so simple. You use the "free transform"
tool to do this, and that is found under "edit -> free transform"
in the menu bar. What you will see after selecting this tool is
a solid line box with pull handles around your new layer, like the
following:
There
are a couple of rather simple but VERY important things to know
about using "free transform". The first thing to note
is that your cursor changes shape now as you move around the screen.
If you move your cursor near one of the corners, it changes into
a small curved line with arrowheads at each end. This is for rotating
the layer on its axis, which is in the center (small plus and circle
together). If you place the cursor over that axis point, it will
let you move it too. If you place the cursor over one of the pull
boxes (at the corners and middle of each side), your cursor will
change shape to indicate that you can drag that side or corner to
resize the layer.
Now...only
ONE more important thing, and the most important of all. If you
use the pull boxes to resize your layer, you HAVE to keep the proportions
of the layer constant with the background image, or you'll never
get them to match exactly. You can constrain the proportions of
the layer by holding down the "shift" key while dragging
the corner pull boxes around.
Another
note before you get started - you can use the cursor arrow keys
on your keyboard (between the letters and the number pad) to fine-tune
move the box around to get the best match.
The
break-down:
1.
With all that having been said, pick a spot you will use as your
anchor spot. I like using the top-left corner of the "1"
in the date as my guide. Use your cursor arrow keys to move the
layer so the top left corners of the "1" match in both
images (hint...it will look much like a full opacity image when
you've got them aligned).
2.
Using the rotate feature, cursor arrow keys, and the corner pull
boxes (with the SHIFT key), resize the new layer so it looks like
the rest of the date blends right in with the background image.
It may take some time and practice to get this right.
3.
What you should end up with is the following idea...the date looks
right-on aligned...if the mint marks are in the same position, they
will line up too. If they are not in the same position (different
dies) they will not match, and it should be somewhat obvious. Take
a look:
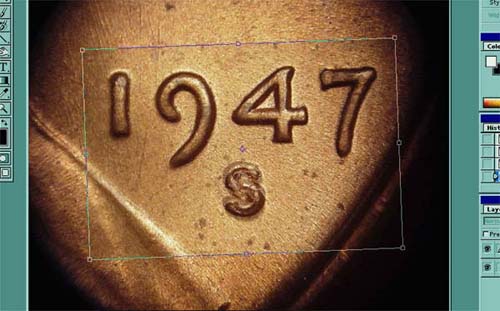
With
my new layer still at 50%, the date looks pretty much like a normal
photograph of a single coin if it's aligned properly. Notice how
the mint mark area still looks like a jumbled mix of pixels. Well,
this means they are not the same die, and the overlay has proven
it.
If
you would like to save both images with the same alignment, from
this point simply crop the image so both are the same size, turn
the opacity of the new layer back up to 100%, and save a copy of
the file as-is. Then throw away the new layer (the trash can is
at the bottom of the layers box) and save the file again with a
different file name.
If
you would like a 50% opacity image to show someone that the mint
marks do not match, simply leave the opacity at 50% when you save
your first image. Then turn it up to 100% for your second image,
and toss the new layer for a third image. This will give you each
die in the raw and a third image with the two stuck together for
comparison.
Other
uses for overlays: Overlays can be used for
many different purposes in this general context (numismatics). You
can compare letter sizes on coins that may be confusing, you can
check to see if a die scratch is in exactly the same position between
two images. You can glue two images taken side-by-side together
to make one image using an overlay. Experiment and play with the
technique, and I'm sure you will find all sorts of neat things you
can now do using them!
|